Python的安装与使用
安装python环境
1.下载安装python:
1 | www.python.org |
2.添加到环境变量:
1 | Add Python 3.11 to PATH |
3.测试:
1 | 1.打开cmd |
Python的基本数据类型
四种基本数据类型介绍
类是对象的抽象,而对象是类的具体实例。
字符串基本用法
1. 字符串的创建:
任何在双引号之间的文字 “abc”
单引号和双引号完全一样 ‘abc’
单引号作为字符串需要外加双引号 “ ‘abc’”
三个引号用于引用长段的文字或说明,只要三个引号不完,就可以随意换行写文字
“””a
b
c
“””
2. 数据类型转换:
1 | #整型转换为字符串类型 |
'12'
3. 转义字符:
1 | #输出一些特殊符号 |
4. 换行符:
1 | print('a\nb') |
a
b
5. 字符串的拼接:
1 | a = "Sheldon" |
'Sheldon is perfect'
6. 切片:
1 | name = 'Sharon' |
'norahS'
字符串常用的函数
1. 替换string.replace(‘str1’,’str2’,max):
语法:str.replace(old, new, max)
old – 将被替换的子字符串
new – 新字符串,用于替换old子字符串
max – 可选字符串, 替换不超过 max 次
2. 字符串的长度len(string):
1 | name = "sheldon" |
7
3. 字符串的拆分string.split():
string.split(‘.’times)默认空格分隔符,可以规定分隔符,可以规定分割次数。
返回值:返回分割后的字符串列表
1 | web = "www.baidu.com" |
['www', 'baidu', 'com']
4. 计数string.count(‘str’):
计数string.count(‘str’),返回计数值
描述:count()方法用于统计字符串里某个字符或字符串出现的次数。
1 | web ='www.baidu.com' |
2
5. 字符串连接str.join(‘sequence’):
join()方法用于将序列中的元素以指定的字符连接生成一个新的字符串
str.join(sequence)
1 | head = '-' |
'w-w-w-.-b-a-i-d-u-.-c-o-m'
Python的基本数据结构
列表
列表中的每个元素都是可变的
列表中的元素是有序的,也就是每一个元素都有一个位置
列表可以容纳python中的任何对象
1 | info = ['name','age','sex','1.0','True','(1,2)','[3,4]'] |
1. 列表的创建:
1 | #字符串转列表 |
['name', 'age']
2. 访问元素:
1 | name_list = ['sheldon','sharon','anna'] |
['sheldon', 'sharon']
3. 修改元素:
1 | name_list = ['sheldon','sharon','anna'] |
['davad', 'sharon', 'anna']
4. 添加列表元素:
1 | #添加到元素尾部 list.append('element') |
['davad', 'sharon', 'anna', 'lily']
1 | #指定位置插入指定的值 list.insert(position,element) |
['sheldon', 'sheldon', 'davad', 'sharon', 'anna', 'lily']
5. 列表元素的删除:
1 | #list.pop()删除最后一个元素,返回值:删除后的元素 |
'lily'
1 | # del list[position],删除指定位置的元素 |
1 | # list.remove('移除列表中的元素') |
1 | #del name_list 删除整个列表 |
6. 列表的嵌套使用:
1 | lis = [[1,2],[3,4]] |
2
7. 列表的合并:
1 | list1 = ['name'] |
['name', 'age']
1 | #在list1的基础上添加上list2,在尾部添加 |
['name', 'age', 'age']
8. 列表元素的判断:
1 | # 使用in判断一个元素是否在list中 |
True
9. 计算列表的长度:
1 | #查看一个列表的长度;返回值 列表的长度, |
2
10. 计算某个元素在列表中出现的位置:
1 | num = [1,2,3,2,4] |
1
字典
1. 字典的创建:
1 | #1直接创建 dic = {key:value} |
{'name': 'sheldon'}
1 | #2dict()方法创建 |
{'name': 'sheldon', 'age': 30}
1 | #3 zip()方法创建 |
{'name': 'sheldon', 'sex': 'male', 'age': '30'}
2. 字典的取值:
1 | #dic[key],返回值对应的value |
'sheldon'
1 | # dic.get() |
'sheldon'
1 | # 判断某个值是否在字典中 key in dic |
True
3. 字典增加值:
1 | dic['sex'] = 'male' |
{'name': 'sheldon', 'sex': 'male'}
4. 字典值的修改:
1 | dic['sex'] = 'female' |
{'name': 'sheldon', 'sex': 'female'}
5. 字典的合并:
1 | #update()字典的合并 |
{'one': 1, 'two': 2, 'three': 3, 'four': 4}
6. 删除字典的值:
1 | del dic['sex'] |
7. 字典中值的常用方法:
1 | # dict.keys()函数以列表返回一个字典所有的keys |
dict_keys(['name'])
1 | # dict.values()函数以列表返回一个字典所有的values |
dict_values(['sheldon'])
1 | # dict.items()函数以列表返回一个字典所有的(key,value)元组数组。 |
dict_items([('name', 'sheldon')])
元组
元组:任意类型的元素组成的序列。tuple
元组是不可变的。
1. 元组的创建:
1 | tup = (1,2,3) |
(1, 2, 3)
2. 元组的查找:
1 | tup[0] |
1
3. 列表转换为元组:
1 | #Python 元组 tuple() 函数将列表转换为元组。 |
('sheldon', 'sharon')
集合
集合的元素是任意的,不重复的,无序的。
1. 集合的创建:
1 | #直接创建 |
{5, 'sharon'}
1 | #set()函数创建 |
{'sharon', 'sheldon'}
2. 集合的运算:
1 | set1 = {1,2,3,'a','b'} |
{1, 'a'}
Python的代码结构
逻辑判断
1. 逻辑判断True & False:
布尔类型(Boolean)的数据只有两种,True 和 False。
1 | 1>2 |
<>:7: SyntaxWarning: "is" with a literal. Did you mean "=="?
<>:7: SyntaxWarning: "is" with a literal. Did you mean "=="?
<ipython-input-83-c27b0b034c29>:7: SyntaxWarning: "is" with a literal. Did you mean "=="?
  number is 12


True
2. 比较运算(Comparison):
如果比较式成立返回True,不成立返回False。
1 | == #左右两边等值得时候返回 True |
1 | # 多条件比较 |
1 | #变量得比较 |
3. 成员运算符与身份运算符(Membership):
成员运算符和身份运算符得关键词是 in 与 is。把in放在两个对象中间的含义是,测试前者是否存在于in后面的集合中。
1 | album = ['Black Star','David Bowie',25,True] |
True
4. 布尔运算符(Boolean Operators):
1 | and 、 or用于布尔值之间的运算 |
1 | not x # 如果x是True,则返回False,否则返回True. |
条件控制if-else

if…else结构的作用:如果…条件是成立的,就做…;反之,就做…
1 | # creat a list |
for循环
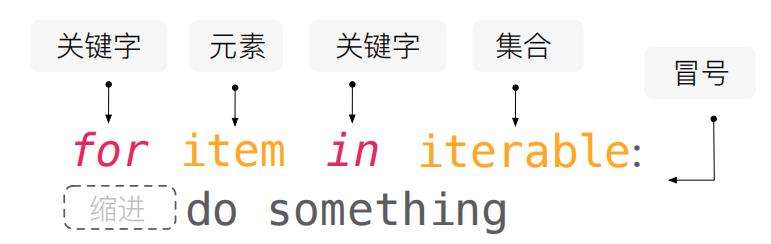
1 | for i in range(1,10): |
1X1=1

2X1=2 2X2=4

3X1=3 3X2=6 3X3=9

4X1=4 4X2=8 4X3=12 4X4=16

5X1=5 5X2=10 5X3=15 5X4=20 5X5=25

6X1=6 6X2=12 6X3=18 6X4=24 6X5=30 6X6=36

7X1=7 7X2=14 7X3=21 7X4=28 7X5=35 7X6=42 7X7=49

8X1=8 8X2=16 8X3=24 8X4=32 8X5=40 8X6=48 8X7=56 8X8=64

9X1=9 9X2=18 9X3=27 9X4=36 9X5=45 9X6=54 9X7=63 9X8=72 9X9=81
1 |
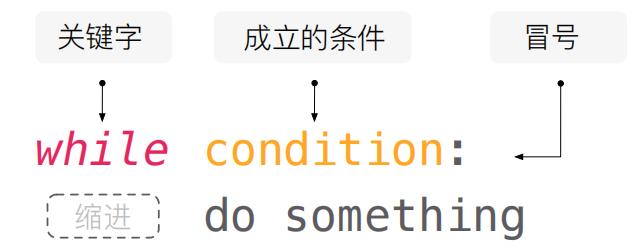
while循环
1 | #是2的倍数变平方,输入666 退出 |
Please enter a num:45
Please enter a num:44
1936


---------------------------------------------------------------------------

KeyboardInterrupt                         Traceback (most recent call last)

<ipython-input-89-7cf1d578e883> in <module>
      1 while True:
----> 2     num = int(input('Please enter a num:'))
      3     if num == 666:
      4         break
      5     if num%2!=0:


d:\ProgramData\Anaconda3\lib\site-packages\ipykernel\kernelbase.py in raw_input(self, prompt)
    858                 "raw_input was called, but this frontend does not support input requests."
    859             )
--> 860         return self._input_request(str(prompt),
    861             self._parent_ident,
    862             self._parent_header,


d:\ProgramData\Anaconda3\lib\site-packages\ipykernel\kernelbase.py in _input_request(self, prompt, ident, parent, password)
    902             except KeyboardInterrupt:
    903                 # re-raise KeyboardInterrupt, to truncate traceback
--> 904                 raise KeyboardInterrupt("Interrupted by user") from None
    905             except Exception as e:
    906                 self.log.warning("Invalid Message:", exc_info=True)


KeyboardInterrupt: Interrupted by user
列表推导式
list = [item for item in iterable]
1 | #普通的列表添加元素 |
1 | # 列表推导式添加元素 |
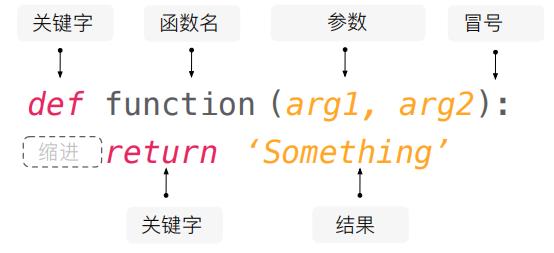
函数
1 | #自带函数 |
开始创建函数
1 | #先定义 |
函数的参数
函数的参数有两种:位置参数(position argument) 和 关键词参数 (keyword argument)
1 | def trapezoid_area(base_up, base_down, height): |
4.5
1 |
匿名函数lambda()的使用
lambda函数是一种小的匿名函数。
lambda函数可接受任意数量的参数,但只能有一个表达式。
lambda arguments : expression
1 | # 一个 lambda 函数,它把作为参数传入的数字加 10,然后打印结果: |
15
设计一个自己的函数
1 | def text_create(name,msg): |
异常处理
介绍
1 | try: |
1. try-except捕获异常:
1 | try: |
2. try-except 捕获具体异常:
1 | try: |
3. try-except 对异常进行分别处理:
1 | try: |
python常见的异常类型
1. NameError:尝试访问一个未申明的变量:
1 | t |
2. ZeroDivisionError:除数为0:
1 | v = 1/0 |
3. SyntaxError:语法错误:
1 | int int |
4. IndexError:索引超出范围:
1 | List = [2] |
5. KeyError:字典关键字不存在:
1 | Dic = {'1':'yes', '2':'no'} |
6. IOError:输入输出错误:
1 | f = open('abc') |
7. AttributeError:访问未知对象属性:
1 | class Worker: |
8. ValueError:数值错误:
1 | int('d') |
9. TypeError:类型错误:
1 | iStr = '22' |
10. AssertionError:断言错误:
1 | assert 1 != 1 |
11. MemoryError:内存耗尽异常:
12. NotImplementedError:方法没实现引起的异常:
1 | v = 1/0 |
13. LookupError:键、值不存在引发的异常:
LookupError异常是IndexError、KeyError的基类, 如果你不确定数据类型是字典还是列表时,可以用LookupError捕获此异常
14. StandardError 标准异常:
除StopIteration, GeneratorExit, KeyboardInterrupt 和SystemExit外,其他异常都是StandarError的子类。
Python模块与包管理
模块
介绍
一个.py文件就是一个模块。
好处:
✔1.大大提高代码的可维护性。
✔2.编写代码不必从零开始。
✔3.一个模块编写完成,可以被引用到其他地方。
包含:
✔1.内置模块。
✔2.第三方模块。
创建模块
1. 创建一个.py文件:
实现一个功能
导入模块
1. 直接导入模块:
1 | #导入 |
2. 使用别名:
1 | #导入 |
3. 导入函数:
1 | #导入 |
4. 导入函数+别名:
1 | #导入 |
包
多个模块组织成文件层次,这就是包
要在目录下面添加一个文件 init.py
这个目录就作为一个包
增加模块init.py
库
标准库
1 | python自带的库 |
第三方库
1 | 包 管理工具 |
1. pip安装:
1 | pip install 包名 |
2. 安装指定版本:
1 | pip install numpy==1.13.1 |
3. pip卸载:
1 | pip uninstall 包名 |
4. pip更新:
1 | pip install --upgrade pip |
5. requirement.txt安装多个,文件内容:
1 | pip install -r requirement.txt |
Python的类和对象
类和对象的创建
类是对象的抽象,而对象是类的具体实例。
对象
Python所有数据都是以对象的形式存在。对象既包含数据(特征),也包含函数(方法)。
如lis=[1,2,3] 有元素数据,也有append等方法。
类的属性
1. 定义一个类:
类(class),具有一系列共同特征和行为事物的抽象概念的总和。
1 | #可口可乐 |
2. 类的实例化:
实例(instance),在左边创建一个变量,右边写上类的名称,实现赋值的行为。
1 | #instance |
['caffeine', 'sugar', 'water', 'soda']
['caffeine', 'sugar', 'water', 'soda']
['caffeine', 'sugar', 'water', 'soda']
3. 类属性引用:
在类的名字后面写上”.”set自动出现定义类的属性
类的属性会被所有类的实例共享。
1 | for element in coke_for_me.formula: |
4. 实例属性:
实例属性(Instance Atrribute),实例的变量就是实例变量,而实例变量有个专有术语,称为实例属性。
1 | #instance |
['caffeine', 'sugar', 'water', 'soda']
可口可乐
类的方法
5. 实例方法:
实例方法(Instance Method),方法是函数,方法是给实例使用的。
1 | #可口可乐 |
1 | #使用实例方法 |
Energy!
1 | #证明: |
Energy!
Energy!
6. 实例方法多个参数:
1 | class CocaCola: |
1 | ice_coke = CocaCola() |
Cool!
7. __init__方法:
init方法来定义实例属性
1 | class CocaCola: |
1 | coke = CocaCola() |
Energy!


'可口可乐'
1 | class CocaCola: |
1 | coke=CocaCola('可口可乐') |
'可口可乐'
1 | coke.drink() |
Energy!
类的继承(I)
1 | class CocaCola: |
1 | coca=CocaCola("可口可乐") |
You got 140 cal energy!


'可口可乐'
类的继承(inheritance),子类继承了类的部分属性和方法。
1 | class CaffeineFree(CocaCola): |
1 | coca_a = CaffeineFree('CocaCola-free') |
You got 140 cal energy!


'CocaCola-free'
我们在新的类CaffeineFree后面的括号中放入CocaCola,这表示这个类是继承于CocaCola这个父类。
而CaffeineFree则成为了CocaCola子类。类中的变量和方法可以完全被子类继承,如果有特殊改动可以进行覆盖(Override)。
类的继承(II)
1 | class Animial: |
1 | dog = Animial(30,100) |
30


100
1. 子类继承:
1 | class Dog(Animial): |
1 | dog_1 = Dog(20,40) |
woo~
2. 添加修改方法:
1 | class Cat(Animial): |
1 | cat = Cat(15,30) |
running...
miaomiao~
3. 修改属性:超类:
1 | class Pig(Animial): |
1 | pig = Pig(20,300,'write') |
1 | pig.color |
'write'
类属性与实例属性
1. 类属性重新赋值,是否会影响到类属性的引用:
1 | class TestA: |
1
42
2. 实例属性重新赋值,是否会影响到类属性的引用:
1 | class TestA: |
42
1
3. 类属性与实例属性具有相同的名称,实例引用类的属性还是实例的属性:
1 | class TestA: |
42
类的属性和实例属性的关系
类方法
1. classmethod:
python中cls代表的是类的本身,相对应的self则是类的一个实例对象。
1 | class Dog(): |
we have 3 dogs
2. staticmethod:
1 | 不创建类实例的情况下调用方法。 |
1 | import datetime |
datetime.datetime(2022, 6, 3, 21, 44, 23, 86907)
类的魔术方法
1. __str__:
触发时机:使用print(对象)或者str(对象)的时候触发
功能:查看对象
参数:一个self接收当前对象
返回值:必须返回字符串类型
1 | class Dog: |
Class Dog:
keji
2. __repr__:
触发时机:使用repr(对象)或ptrint(对象)的时候触发
功能:查看对象,与魔术方法__str__类似
参数:一个self接收当前对象
返回值:必须返回字符串类型
1 | class Dog: |
Class Dog:
keji
3. __add__:
触发时机:使用对象进行运算相加的时候自动触发
功能:对象运算
参数:二个对象参数
返回值:运算后的值
1 | class MyAdd: |
17
类的实践
制作一个填充用户假数据的小工具
1. 设计思路:
父类:FakeUser
功能:1.随机名字 a.单字名 b.双字名 c.其他名字 2.随机性别
子类:SnsUser
功能:1.随机数量的跟随着 a.few b.a lot
2. 预处理: 获取姓氏和名字,并用元组保存为常量
1 | fn_path = 'D:/AI/05python/类/first_name.txt' |
('赵', '钱', '孙', '李', '周', '吴', '郑', '王', '冯', '陈', '褚', '卫', '蒋', '沈', '韩', '杨', '朱', '秦', '尤', '许', '何', '吕', '施', '张', '孔', '曹')
('英', '华', '玉', '秀', '文', '明', '兰', '金', '国', '春', '红', '丽', '梅', '云', '芳', '海', '珍', '荣') ('小花', '平萍')
3. 父类: 自动生成姓名和性别
定义虚假用户类,包含两个函数,
函数1:生成名字(从fn和ln中随机选一个字符并连接起来),
函数2:生成性别(男,女)。
1 | import random |
1 | #num=input('请输入名几个字:') |
('郑小花', 'male')
1 | #子类 |
1 | user_b = SnsUser(FakeUser) |
---------------------------------------------------------------------------
TypeError Traceback (most recent call last)
Input In [120], in <cell line: 2>()
1 user_b = SnsUser(FakeUser)
----> 2 user_b.get_followers()
Input In [118], in SnsUser.get_followers(self)
5 def get_followers(self):
----> 6 for i in range(self.count):
7 followers = random.randrange(1,10)
8 print(followers)
TypeError: 'type' object cannot be interpreted as an integer
Python的文件操作
文件的打开写入和关闭
1. 文件的写入:
文件的读写
1. 文件的写入:
1 | poem = 'you are my sunshine!!!' |
2. 文件的读:
1 | f = open('sunshine.txt','rt') |
1 | p |
'you are my sunshine!!!'
3. 二进制文件的写:
1 | b_p = p.encode() |
b'you are my sunshine!!!'
1 | f = open('b_sunshine','wb') |
4. 二进制文件的读:
1 | f=open('b_sunshine','rb') |
1 | bp |
b'you are my sunshine!!!'
5. 字符串的编码与解码:
1 | 编码:字符串使用unicode编码,为每一个字符编码成二进制格式。 |
1 | #编码 |
b'\xe4\xb8\x80\xe8\xb5\xb7\xe5\xad\xa6AI'
1 | #解码 |
'一起学AI'
6. with的使用:
Python 中的 with 语句用于异常处理,封装了 try…except…finally 编码范式,提高了易用性。
1 | #写 |
1 | #追加 |
1 | #读 |
1 | p |
'you are my sunshine!!!you are my sunshine!!!you are my sunshine!!!'
三种读取文本数据的方法
read()读取全部文本
1 | with open('Saying Good-bye to Cambridge Again.txt','rt',encoding='utf-8') as file: |
1 | print(p) |
再别康桥 Saying Good-bye to Cambridge Again
作者:徐志摩 By Xu Zhimo
轻轻的我走了, Very quietly I take my leave
正如我轻轻的来; As quietly as I came here;
我轻轻的招手, Quietly I wave good-bye
作别西天的云彩。 To the rosy clouds in the western sky.
那河畔的金柳, The golden willows by the riverside
是夕阳中的新娘; Are young brides in the setting sun;
波光里的艳影, Their reflections on the shimmering waves
在我的心头荡漾。 Always linger in the depth of my heart.
readline()按行读取文本
1. readline()按行读取文本:
1 | with open('Saying Good-bye to Cambridge Again.txt','rt',encoding='utf-8') as file: |
1 | p |
'作者:徐志摩\tBy Xu Zhimo \n'
2. readline()按行读取全部文本:
1 | poem='' |
再别康桥 Saying Good-bye to Cambridge Again
作者:徐志摩 By Xu Zhimo
轻轻的我走了, Very quietly I take my leave
正如我轻轻的来; As quietly as I came here;
我轻轻的招手, Quietly I wave good-bye
作别西天的云彩。 To the rosy clouds in the western sky.
那河畔的金柳, The golden willows by the riverside
是夕阳中的新娘; Are young brides in the setting sun;
波光里的艳影, Their reflections on the shimmering waves
在我的心头荡漾。 Always linger in the depth of my heart.
3. readlines()读取文本转化为列表:
1 | with open('Saying Good-bye to Cambridge Again.txt','r',encoding='utf-8') as file: |
1 | print(lines) |
['再别康桥\tSaying Good-bye to Cambridge Again\n', '作者:徐志摩\tBy Xu Zhimo \n', '\n', '轻轻的我走了,\tVery quietly I take my leave\n', '正如我轻轻的来;\tAs quietly as I came here;\n', '我轻轻的招手,\tQuietly I wave good-bye\n', '作别西天的云彩。\tTo the rosy clouds in the western sky.\n', ' \t \n', '那河畔的金柳,\tThe golden willows by the riverside\n', '是夕阳中的新娘;\tAre young brides in the setting sun;\n', '波光里的艳影,\tTheir reflections on the shimmering waves\n', '在我的心头荡漾。\tAlways linger in the depth of my heart.']
使用迭代器读取文本
1 | f = open('Saying Good-bye to Cambridge Again.txt','r',encoding='utf-8') |
再别康桥 SAYING GOOD-BYE TO CAMBRIDGE AGAIN
作者:徐志摩 BY XU ZHIMO
轻轻的我走了, VERY QUIETLY I TAKE MY LEAVE
正如我轻轻的来; AS QUIETLY AS I CAME HERE;
我轻轻的招手, QUIETLY I WAVE GOOD-BYE
作别西天的云彩。 TO THE ROSY CLOUDS IN THE WESTERN SKY.
那河畔的金柳, THE GOLDEN WILLOWS BY THE RIVERSIDE
是夕阳中的新娘; ARE YOUNG BRIDES IN THE SETTING SUN;
波光里的艳影, THEIR REFLECTIONS ON THE SHIMMERING WAVES
在我的心头荡漾。 ALWAYS LINGER IN THE DEPTH OF MY HEART.
结构化数据读取
CSV文件读取和写入
CSV 文件又称为逗号分隔值文件,用以存储表格数据,包括数字或者字符的文件格式。
csv 模块中的 writer 类可用于读写序列化的数据.
writer(csvfile, dialect=’excel’, **fmtparams)
参数说明:
csvfile:必须是支持迭代(Iterator)的对象,可以是文件(file)对象或者列表(list)对象。
dialect:编码风格,默认为 excel 的风格,也就是使用逗号,分隔。
fmtparam:格式化参数,用来覆盖之前 dialect 对象指定的编码风格。
1 | students = "'Anna','Sheldon','Sharon'" |
1. writerow(): writerow()将一个列表全部写入csv的同一行。
1 | import csv |
1 | #追加 |
2. writerows(): writerows()将一个二维列表中的每一个列表写为一行。
1 | student = [['Anna'],['Sheldon'],['Sharon']] |
1 | with open('student.csv','w',newline='') as file: |
1 | student4 = [['sun']] |
知识点总结:newline=’’避免添加空行
3. CSV文件的读取: csv.reader(csvfile, dialect=’excel’, **fmtparams)
1 | with open('student.csv','r') as file: |
1 | print(student) |
[['Anna'], ['Sheldon'], ['Sharon'], ['sun']]
4. csv实战: Excel to CSV
1 | import pandas as pd |
1 | data=database.to_csv('test01.csv',encoding='utf-8') |
1 | pd.read_csv('test01.csv') |
| Unnamed: 0 | Unnamed: 0.1 | 编号 | 姓名 | 性别 | 出生日期 | 失踪时身高 | 失踪时间 | 失踪地点 | 注册时间 | 失踪年份 | 出生年份 | 注册年份 | 失踪时年龄 | 注册与失踪时间相隔时长/年 | 失踪地 | |
|---|---|---|---|---|---|---|---|---|---|---|---|---|---|---|---|---|
| 0 | 0 | 0 | 1 | 王刚 | 男 | 31820 | 120厘米左右 | 34257 | 四川省,巴中市,北街道牛鼻山村林家坝 | 2021-12-15 19:16:00 | 1993 | 1987 | 2021 | 6.0 | 28 | 四川 |
| 1 | 1 | 1 | 2 | 胡振华 | 男 | 36721 | 120厘米左右 | 38712 | 广东省,韶关市, 坪石镇 | 2016-05-25 15:40:00 | 2005 | 2000 | 2016 | 5.0 | 11 | 广东 |
| 2 | 2 | 2 | 3 | 靳方杰 | 男 | 39360 | 未知 | 44502 | 河南省,南阳市,西峡县田关镇河上村河上组 | 2021-11-25 22:37:00 | 2021 | 2007 | 2021 | 14.0 | 0 | 河南 |
| 3 | 3 | 3 | 4 | 詹鑫涛 | 男 | 39780 | 143厘米左右 | 44504 | 广东省,梅州市,华城镇河唇街1号 | 2021-11-25 13:11:00 | 2021 | 2008 | 2021 | 13.0 | 0 | 广东 |
| 4 | 4 | 4 | 5 | 张晓男 | 女 | 37443 | 110厘米左右 | 39608 | 浙江省,金华市,浦南街道,平安村,新店村 | 2021-10-31 19:40:00 | 2008 | 2002 | 2021 | 6.0 | 13 | 浙江 |
| ... | ... | ... | ... | ... | ... | ... | ... | ... | ... | ... | ... | ... | ... | ... | ... | ... |
| 4102 | 4102 | 8163 | 4103 | 孔 | 女 | 30123 | 110厘米左右 | 33863 | 安徽省,合肥市,长丰县南孔村孔四组 | 2020-06-21 15:08:00 | 1992 | 1982 | 2020 | 10.0 | 28 | 安徽 |
| 4103 | 4103 | 8164 | 4104 | 刘继林(小名:维维) | 男 | 30317 | 未知 | 32509 | 四川省广汉市连山镇 | 2010-01-22 19:27:00 | 1989 | 1983 | 2010 | 6.0 | 21 | 四川 |
| 4104 | 4104 | 8166 | 4105 | 熊雷 | 男 | 32031 | 未知 | 33056 | 四川省宜宾市翠屏区生产巷24号河边 | 2011-08-31 13:14:00 | 1990 | 1987 | 2011 | 3.0 | 21 | 四川 |
| 4105 | 4105 | 8167 | 4106 | 田外兴(乳名) | 男 | 16657 | 未知 | 17258 | 陕西省,延安市,崂山乡苏家河村 | 2020-08-08 18:51:00 | 1947 | 1945 | 2020 | 2.0 | 73 | 陕西 |
| 4106 | 4106 | 8168 | 4107 | 罗陕陕 | 女 | 33853 | 未知 | 34862 | 贵州省,贵阳市,花溪区 | 2014-09-16 10:33:00 | 1995 | 1992 | 2014 | 3.0 | 19 | 贵州 |
4107 rows × 16 columns
Json序列化
JSON 指的是 JavaScript 对象表示法(JavaScript Object Notation)。它是一种使用文本存储数据对象的格式。
1. Json.dumps(data): 将Python对象(dictionary)转化为Json对象
1 | data = {'name':'一起学AI','wechat':'zhaixueziyue','备注':'学AI'} |
1 | data |
{'name': '一起学AI', 'wechat': 'zhaixueziyue', '备注': '学AI'}
1 | import json |
'{"name": "一起学AI", "wechat": "zhaixueziyue", "备注": "学AI"}'
2. json.loads(): 将JSON字符串转换为Python字典。
1 | json.loads(learningAI) |
{'name': '一起学AI', 'wechat': 'zhaixueziyue', '备注': '学AI'}
Pickle序列化
pickle模块:实现Python对象的持久化存储。
1. pickle.dumps(data): 将 Python 中的对象序列化成二进制对象,并返回。
1 | import datetime |
2022-06-10 08:31:04.398054
1 | import pickle |
b'\x80\x04\x95*\x00\x00\x00\x00\x00\x00\x00\x8c\x08datetime\x94\x8c\x08datetime\x94\x93\x94C\n\x07\xe6\x06\n\x08\x1f\x04\x06\x12\xe6\x94\x85\x94R\x94.'
2. pickle.loads(data): 读取给定的二进制对象数据,并将其转换为 Python 对象。
1 | time=pickle.loads(pickle_time) |
2022-06-10 08:31:04.398054
3. pickle存储: 任何数据类型
1 | list =['Sheldon','Sharon','Sun'] |
1 | name=pickle.dumps(list) |
b'\x80\x04\x95\x1e\x00\x00\x00\x00\x00\x00\x00]\x94(\x8c\x07sheldon\x94\x8c\x06sharon\x94\x8c\x03sun\x94e.'
1 | pickle.loads(name) |
['sheldon', 'sharon', 'sun']
若你觉得我的文章对你有帮助,欢迎点击上方按钮对我打赏
扫描二维码,分享此文章